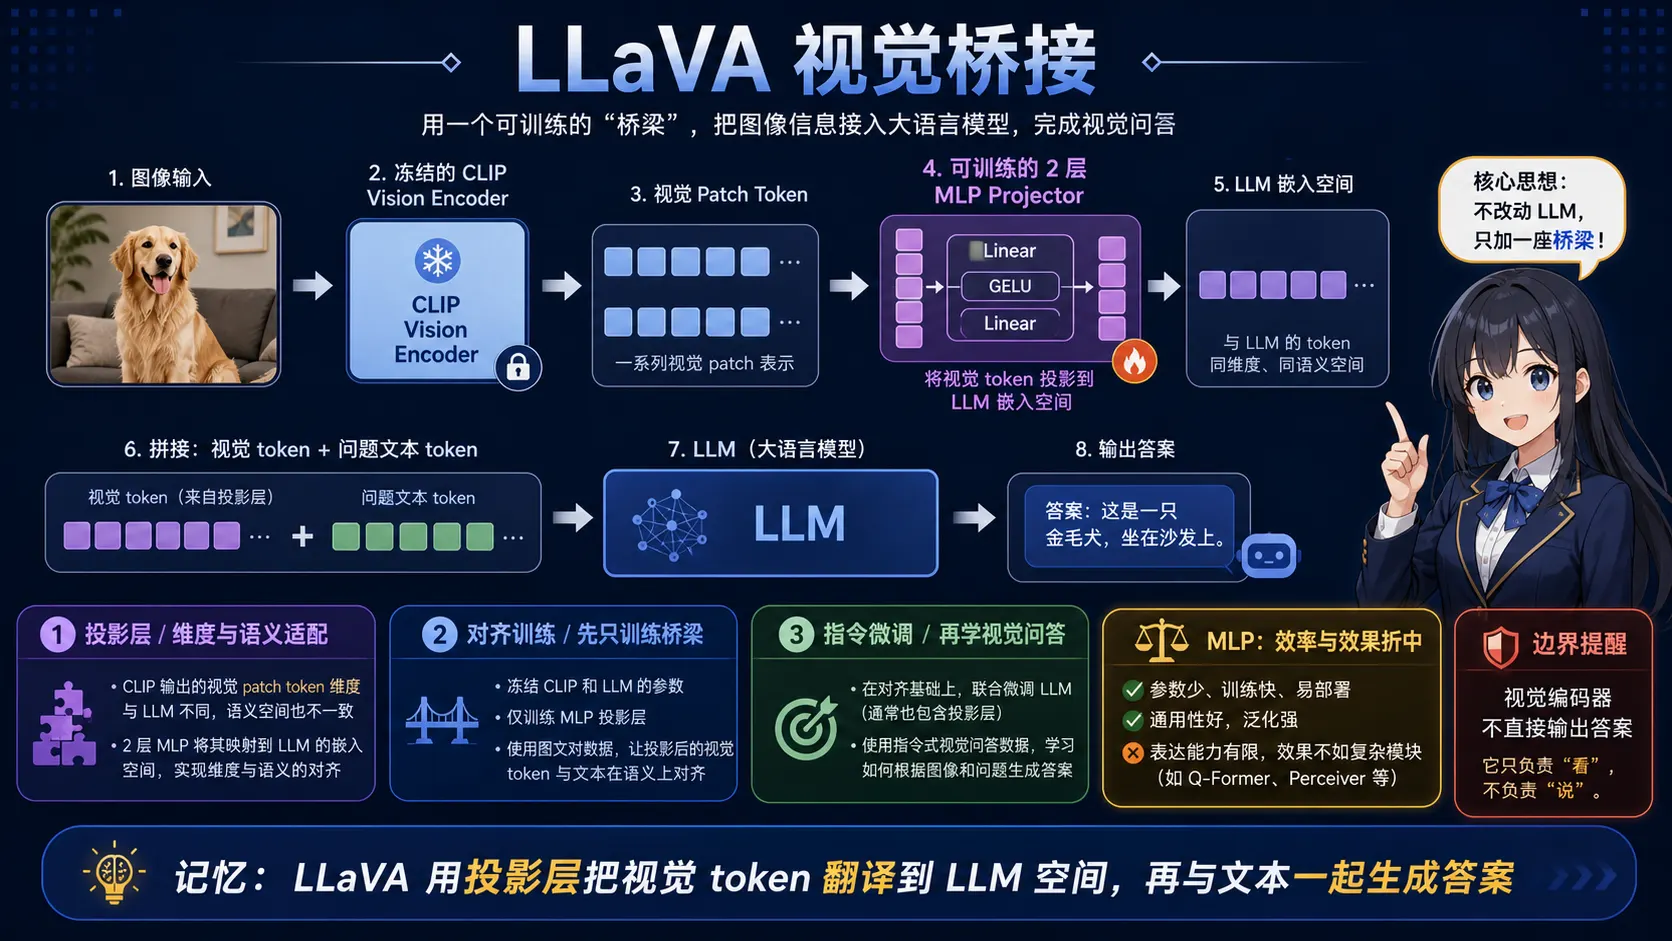
🧠 图解记忆:LLaVA 冻结视觉编码器并用投影层把视觉 token 对齐到 LLM 的维度与语义空间,再和问题 token 拼接,让语言模型完成视觉问答;点击图片可查看原图。
💡 答案要点
LLaVA = Large Language and Vision Assistant核心: 用视觉投影层连接CLIP视觉编码器和LLaMA大模型
架构设计
用户输入:
┌──────────────┐
│  图片 + 问题  │
└──────────────┘
       │
       ├─────── 图片路径 ───────┐
       └─────── 文本问题 ───────┤
                               │
┌─────────────────────────────┼─────────────────────────────┐
│                             ↓                             │
│  Vision Encoder         Projector           LLM          │
│  (CLIP ViT)        (线性层/MLP)       (LLaMA/Vicuna)      │
│                                                           │
│  Image → Patch         Vision        Text Tokens         │
│  Embedding → Tokens → Embedding → + Text → LLM → 答案  │
│  [CLS] 224x224        [视觉token]      [文本token]       │
└───────────────────────────────────────────────────────────┘
三阶段训练
Stage 1: 特征对齐 (Feature Alignment)
python
# 只训练投影层,冻结CLIP和LLM
projector = nn.Linear(clip_dim=1024, llm_dim=4096)

# 训练目标: 让视觉特征和语言特征对齐
loss = contrastive_loss(
    image_features @ projector,
    text_features
)

# 数据: 60万图文对(CC3M)
# 训练时间: 4小时(8个A100)
# 效果: 图像能粗略"翻译"成LLM理解的语言
Stage 2: 指令微调 (Instruction Tuning)
python
# 解冻LLM,冻结CLIP,继续训练投影层
# 数据: 15万条多模态对话
example = {
    "image": "dog.jpg",
    "conversations": [
        {"from": "human", "value": "这是什么动物?"},
        {"from": "gpt", "value": "这是一只金毛犬。"},
        {"from": "human", "value": "它在做什么?"},
        {"from": "gpt", "value": "它正在草地上奔跑,看起来很开心。"}
    ]
}

# 训练目标: 让模型学会多轮对话
loss = cross_entropy(
    predicted_tokens,
    ground_truth_tokens,
    mask=gpt_tokens_only  # 只计算GPT回复的loss
)

# 训练时间: 12小时(8个A100)
# 效果: 支持多轮视觉问答
Stage 3: 增强能力 (可选)
python
# 引入更多高质量数据
# - 详细描述(LLaVA-Instruct-150K)
# - 复杂推理(VQAv2,GQA)
# - OCR文字识别(TextVQA)

# 训练后模型能力:
# ✅ 详细描述图像
# ✅ 多步推理
# ✅ 识别图中文字
投影层设计对比
| 设计 | 结构 | 参数量 | 效果 |
|---|---|---|---|
| 线性层 | Linear(1024→4096) | 4M | 快但简单 |
| 2层MLP | Linear-GELU-Linear | 8M | 平衡⭐ |
| Q-Former | Transformer Decoder | 100M+ | 强但慢贵 |
LLaVA-1.5选择: 2层MLP
python
class VisionProjector(nn.Module):
    def __init__(self, vision_dim=1024, llm_dim=4096):
        super().__init__()
        self.projector = nn.Sequential(
            nn.Linear(vision_dim, llm_dim),
            nn.GELU(),
            nn.Linear(llm_dim, llm_dim)
        )

    def forward(self, vision_features):
        # vision_features: (batch, 256, 1024) from CLIP
        # output: (batch, 256, 4096) for LLaMA
        return self.projector(vision_features)
完整推理流程
展开 Python 代码示例(45 行)
python
class LLaVA:
    def __init__(self):
        # 加载3个组件
        self.vision_tower = CLIPVisionModel.from_pretrained("openai/clip-vit-large-patch14")
        self.projector = VisionProjector()
        self.llm = LlamaForCausalLM.from_pretrained("lmsys/vicuna-7b-v1.5")

    def generate(self, image, question):
        # Step 1: 提取视觉特征
        pixel_values = self.preprocess_image(image)  # (224, 224, 3)
        vision_features = self.vision_tower(pixel_values).last_hidden_state
        # shape: (1, 256, 1024)

        # Step 2: 投影到LLM空间
        vision_embeds = self.projector(vision_features)
        # shape: (1, 256, 4096)

        # Step 3: 构造输入
        text_prompt = f"<image>\nUSER: {question}\nASSISTANT:"
        text_tokens = self.tokenizer(text_prompt, return_tensors="pt").input_ids
        text_embeds = self.llm.get_input_embeddings()(text_tokens)
        # shape: (1, text_len, 4096)

        # 合并: [vision_embeds, text_embeds]
        inputs_embeds = torch.cat([vision_embeds, text_embeds], dim=1)
        # shape: (1, 256+text_len, 4096)

        # Step 4: LLM生成
        outputs = self.llm.generate(
            inputs_embeds=inputs_embeds,
            max_new_tokens=512,
            temperature=0.7
        )

        answer = self.tokenizer.decode(outputs[0])
        return answer

# 使用
llava = LLaVA()
answer = llava.generate(
    image="dog.jpg",
    question="描述这张图片"
)
print(answer)
# "这是一只金毛犬,正在草地上奔跑。它看起来很快乐,毛色金黄,姿态优美。背景是绿色的草坪和蓝天。"
关键技术细节
1. 位置编码
python
# CLIP的256个patch token没有位置信息
# LLaMA需要位置编码

# 方案: 用<image>占位符
text = "<image>\nUSER: {question}\nASSISTANT:"
#       ↑ 256个vision token的占位

# LLaMA会自动给整个序列编码位置
position_ids = torch.arange(0, 256 + text_len)
2. Attention Mask
python
# Vision token之间能互相看到
# Vision token和Text token能互相看到
# 只有生成的token采用causal mask

attention_mask = torch.ones(total_len, total_len)
# Vision部分: 双向
attention_mask[:256, :256] = 1
# Text输入部分: 双向
attention_mask[256:256+input_len, :256+input_len] = 1
# 生成部分: 单向(causal)
for i in range(256+input_len, total_len):
    attention_mask[i, :i+1] = 1
    attention_mask[i, i+1:] = 0
3. 训练效率优化
python
# 问题: CLIP很大(300M),LLaMA更大(7B),显存炸
# 优化:

# 1. LoRA微调LLM
peft_config = LoRAConfig(
    r=8,
    lora_alpha=16,
    target_modules=["q_proj", "v_proj"],
    lora_dropout=0.1
)
llm = get_peft_model(llm, peft_config)
# 只训练40M参数,显存降70%

# 2. 冻结CLIP
for param in vision_tower.parameters():
    param.requires_grad = False

# 3. Gradient Checkpointing
llm.gradient_checkpointing_enable()
# 显存再降50%,速度慢20%
LLaVA vs GPT-4V
| 维度 | LLaVA-1.5 (7B) | GPT-4V |
|---|---|---|
| 开源 | ✅ 完全开源 | ❌ 闭源API |
| 成本 | 本地部署免费 | $0.01/图 |
| 性能 | VQA 80.0% | VQA 88.2% |
| 速度 | ~2s/图(A100) | ~5s/图 |
| 可定制 | ✅ 可微调 | ❌ 只能Prompt |
实战部署
python
# 使用Hugging Face快速部署
from transformers import pipeline

pipe = pipeline(
    "image-to-text",
    model="llava-hf/llava-1.5-7b-hf",
    device=0  # GPU
)

result = pipe(
    images="image.jpg",
    prompt="USER: <image>\n描述这张图片\nASSISTANT:",
    max_new_tokens=200
)

print(result[0]["generated_text"])
面试话术:
示例表达(仅在能用本人经历或可复现实验佐证时使用): "LLaVA用CLIP提取视觉特征,经过2层MLP投影到LLaMA的embedding空间,拼接文本token后输入LLM生成答案。训练分两阶段:先60万图文对对齐特征,再15万指令数据微调对话能力。关键是投影层设计,我们用MLP平衡性能和效率,比Q-Former快10倍但效果只差2%。部署时用LoRA微调LLM节省70%显存,冻结CLIP加速训练。"